
毎回ググるのでメモ。 以下手順。
app/build.gradleのbuildFeaturesを設定
app/build.gradleのbuildFeaturesにdataBinding trueを追加する。
buildFeatures {
    viewBinding true
    dataBinding true // これを追加
}
LiveDataを持つViewModelの作成
LiveDataをフィールドに持つViewModelを作成しておく。
今回はsomeTextという名前で追加。
class FirstViewModel : ViewModel() {
    val someText = MutableLiveData("")
}
レイアウトファイルにViewModelの設定と双方向・単方向データバインディングの実装
layoutタグで囲う
もともとのレイアウトファイルを<layout> ... </layout>タグで囲う。
(xmlns:などの必要な属性はlayoutタグに移動)
<?xml version="1.0" encoding="utf-8"?>
<androidx.constraintlayout.widget.ConstraintLayout
  xmlns:android="http://schemas.android.com/apk/res/android"
  xmlns:app="http://schemas.android.com/apk/res-auto"
  xmlns:tools="http://schemas.android.com/tools"
  tools:context=".FirstFragment"
  android:layout_width="match_parent"
  android:layout_height="match_parent">
  <!-- -->
</androidx.constraintlayout.widget.ConstraintLayout >
↓
<?xml version="1.0" encoding="utf-8"?>
<layout xmlns:android="http://schemas.android.com/apk/res/android"
    xmlns:app="http://schemas.android.com/apk/res-auto"
    xmlns:tools="http://schemas.android.com/tools"
    tools:context=".FirstFragment">
  <androidx.constraintlayout.widget.ConstraintLayout
    android:layout_width="match_parent"
    android:layout_height="match_parent">
    <!-- -->
  </androidx.constraintlayout.widget.ConstraintLayout >
</layout>
dataタグでViewModelを設定
layoutタグ直下にdataタグを追加してこのレイアウトで使用するViewModel`を指定する。
<?xml version="1.0" encoding="utf-8"?>
<layout xmlns:android="http://schemas.android.com/apk/res/android"
    xmlns:app="http://schemas.android.com/apk/res-auto"
    xmlns:tools="http://schemas.android.com/tools"
    tools:context=".FirstFragment">
  <!-- data タグを追加 -->
  <data>
    <variable
      name="viewModel"
      type="com.example.myapplication.FirstViewModel" />
  </data>
  <!-- ここまで -->
  <androidx.constraintlayout.widget.ConstraintLayout
    android:layout_width="match_parent"
    android:layout_height="match_parent">
    <!-- -->
  </androidx.constraintlayout.widget.ConstraintLayout >
</layout>
name属性はこのレイアウトでこのViewModelを参照するための変数名。typeはクラス名。
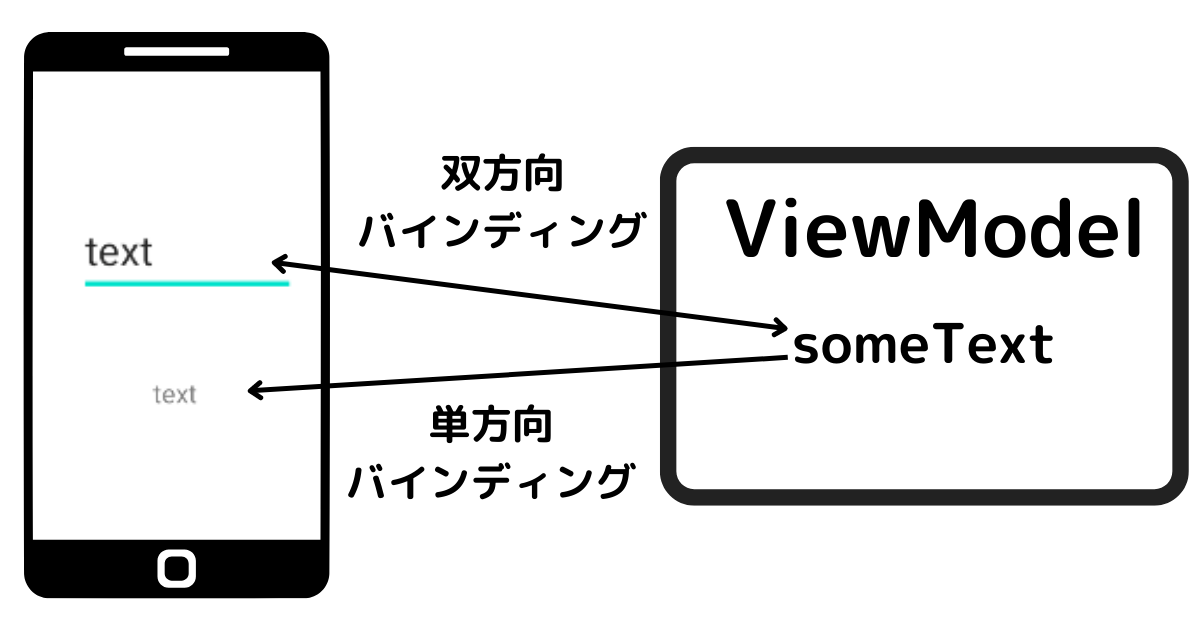
双方向バインディング
双方向バインディングするためには @={}で設定する。
(簡単のためにレイアウトのConstraintに関する属性は省略している。)
<?xml version="1.0" encoding="utf-8"?>
<layout xmlns:android="http://schemas.android.com/apk/res/android"
    xmlns:app="http://schemas.android.com/apk/res-auto"
    xmlns:tools="http://schemas.android.com/tools"
    tools:context=".FirstFragment">
  <data>
    <variable
      name="viewModel"
      type="com.example.myapplication.FirstViewModel" />
  </data>
  <androidx.constraintlayout.widget.ConstraintLayout
    android:layout_width="match_parent"
    android:layout_height="match_parent">
    <!-- -->
    <EditText
      android:id="@+id/foo"
      android:text="@={viewModel.someText}" /> <!-- @={...}で双方向バインディング -->
  </androidx.constraintlayout.widget.ConstraintLayout >
</layout>
これでテキストボックスへの入力でFooViewModel#someTextの値が更新され、
逆にコードでFooViewModel#someTextの値を更新したらテキストボックスの表示が更新される。
単方向バインディング
単方向バインディングするためには @{}で設定する。
<?xml version="1.0" encoding="utf-8"?>
<layout xmlns:android="http://schemas.android.com/apk/res/android"
    xmlns:app="http://schemas.android.com/apk/res-auto"
    xmlns:tools="http://schemas.android.com/tools"
    tools:context=".FirstFragment">
  <data>
    <variable
      name="viewModel"
      type="com.example.myapplication.FirstViewModel" />
  </data>
  <androidx.constraintlayout.widget.ConstraintLayout
    android:layout_width="match_parent"
    android:layout_height="match_parent">
    <!-- -->
    <EditText
      android:id="@+id/foo"
      android:text="@={viewModel.someText}" />
    <TextView
      android:text="@{viewModel.someText}" /> <!-- @{...}で単方向バインディング -->
  </androidx.constraintlayout.widget.ConstraintLayout >
</layout>
これでFooViewModel#someTextの値を更新したらテキストボックスの表示が更新される。
Fragmentでレイアウト(ViewBinding)、ViewModel(LiveData)、Fragmentのライフサイクルを紐づける
ここまでで作ったものをFragmentで統合する。
class FirstFragment : Fragment() {
  private var binding: FragmentFirstBinding? = null
  private val viewModel : FirstViewModel by viewModels()

  override fun onCreateView(...): View? {
    // ViewBindingとViewModelとライフサイクルを紐づける
    binding = FragmentFirstBinding.inflate(inflater, container, false).also {
      it.viewModel = viewModel
      it.lifecycleOwner = this
    }

    return binding?.root
  }
}
特にlifecycleOwnerの設定を忘れがちなので注意する。(なくてもエラーにならずただ反応しない)
動作確認
上記例ではテキストビューがテキストボックスと同じLiveDataを見ているので、
テキストボックスへの入力がテキストビューへ以下の手順で通知される。
- テキストボックスに入力
- FirstViewModel.someTextが更新される
- FirstViewModel.someTextの更新がテキストビューに通知される
- テキストビューが更新される
以下のように連動して見えるようになる。

\確かな知識を身に着けたい、Androidアプリ開発を学びたい人にオススメ!/
